Improving makerspaces for STEM students
Read more to find out how to upgrade makerspace facilities to help STEM students learn valuable product design and engineering skills.
Along with the relief that comes from a return to in-person learning comes a little bit of anxiety.
How can teachers help their students catch up on the learning objectives they may have missed out on during the pandemic?
What’s the best way to go about it?
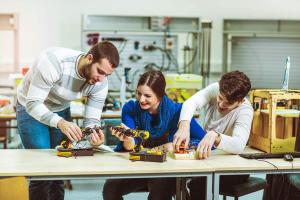
With students returning to school, now it’s time to upgrade makerspace facilities to help students gain valuable STEM skills – by learning how to use 3D printers and CNC machines.
These tools encourage students to pursue their creative ideas and passions while developing important skills in product design, mathematics, engineering, material science, and software programming.
This article explores a high-level look at some of the key makerspace technologies (in 3D printing and CNC machining) that will help STEM students become prepared for future jobs in science and technology – from robotics to manufacturing and everything in-between. It also covers some key tips that facility planners need to know when designing a makerspace layout, including important safety and health information.
ADDITIVE MANUFACTURING
What Is Additive Manufacturing And Its Role In Industry?
When someone from the manufacturing industry talks about additive manufacturing, they mean it as an umbrella term for building objects one layer at a time – as opposed to traditional machining techniques (such as milling), which removes – or subtracts – material from a piece of metal for example.
Isn’t this the same as 3D Printing?
The answer is yes, generally speaking, the terms can be used interchangeably, although the technology is advancing rapidly, and in some cases, additive manufacturing equipment doesn’t bear much resemblance to a printer with a print head.
Terminology aside, additive manufacturing/3D printing is now widely adopted by the industry for prototyping part designs. Increasingly it’s also now used for production parts as well, from engine nozzle parts made of exotic Inconel that power Elon Musk’s rockets to support custom frames and brackets produced by Ford for their cars and trucks.
3D Printing Software Choices
Many students find many mathematics lessons and computer programming projects to be too theoretical, but 3D printing projects are anything but that. The end product, a printed object, is very enticing and motivating for students.
Let’s start at the beginning of the process, which is how software is used to design parts and describe them, so the 3D printer knows how to make them.
There are several ‘disciplines’ to learn to make 3D printed objects from start to finish:
· 3D Modeling Software
More advanced students are eager to learn how to create their own models suitable for printing – and they can by using a wide variety of 3D software, from the open-source Blender to Z-Brush’s pen-based virtual sculpting software.
Learning these tools can really help students learn how to visualize in 3D space; however, if you want to jump ahead, free pre-built models can be downloaded from resources such as Thingverse, allowing students to print existing models, leaving the design of original content for a later day as part of a more advanced course.
· STL Conversion Software
The format that 3D Printers use to create printed objects is a network of triangles that describe the surface, dubbed the STL format. While many 3D software packages may use more sophisticated surface representations (such as NURBS) internally, they almost always offer an STL export option – or standalone software packages (or plugins) that can convert a variety of 3D formats into STL. (Pre-built models may already be available in the STL format, saving you a step.)
· Slicing And Armature Software
3D printers need to know what the cross-section of the model looks as it prints each level. Slicing software, such as Cura or Prusa, translates the STL model into a series of levels (or slices) that the printer can understand, usually written as “G Code.” Also, some models may have cantilevered arches that overhang during the printing process (think of printing a road bridge with big arches) – to keep these areas from sagging, most slicing software allows you to design temporary “support structures” that will be removed once the print job is complete.
· 3D Printer Specific Control Software
Finally, the print job will need to be customized to match the printer’s characteristics (such as nozzle size), ambient temperature conditions, and material choice, as well as the print speed and quality, the temperature of the build plate, etc. These settings can often be set in the slicer software, or you can override them using the 3D printer’s control panel.
Budget 3D Printer Choice: Entry Level Fused Deposition Modeling (FDM)
The least expensive and most common 3D printing technology found in most makerspaces is called Fused Deposition Modeling (FDM) – which is a fancy way of describing a classic 3D printer design that takes in a little bit of plastic filament at a time (via the ‘extruder’) which feeds it through a flexible hose (the ‘Bowden tube’) into a heating element (called the ‘hot end’) which comes out as molten plastic through a nozzle positioned at the exact location determined by the G-code. For longer runs, such as building a wall section of a part, the hot plastic may come out in a continuous pass, in other areas, the nozzle may appear to hop up and down to apply hot plastic to individual areas. Once the plastic cools (a quick process as the amount of material is very small), the printer can move to print the next layer and the next, until the process is complete.
Companies such as Creality and Prusa offer competent entry-level FDM printers in the under $500 and under $1000 price range, respectively.
At these price points, you will generally be required to assemble the printer from a kit when you receive it, but this is an educational process in itself, teaching students (and teachers!) the ins and outs of how to assembly guide wheels, stepper motors, traveling gantries and more.
Useful FDM Printer Upgrades
The Creality Ender 3 is a classic printer, but the earlier versions (before V2) often required some upgrades to deliver consistent performance. These include swapping out a metal extruder (the original is plastic), adding a low-friction Teflon Bowden tube, installing an upgraded “hot end” (to handle higher temp requirements of alternative filament materials, such as ABS) as well as upgrading the stepper motors to have less bounce (as well as produce less noise).
Fortunately, the newer Creality Ender 3 V2 addresses many of these issues. You may also wish to monitor 3D printer forums and comment on YouTube channels (some are suggested below) for other tips and upgrade ideas.
Some users also prefer an automatic way to level the build plates (e.g. the surface that the FDM printer deposit the plastic on) rather than rely on a trial-and-error method of adjusting leveling screw under the plate. BL Touch makes an accessory bed leveling tool, and manufacturers such as Creality are starting to include this feature in their higher price point printers.
What You Need To Know About FDM Printers
Working with 3D Printers in a makerspace or classroom situation is all about managing expectations.
The impatient among us may find the process very tedious and the wait for print times very long.
This can lead to frustration. For example, instructors who create a lesson plan where all the students deliver a final 3D printed project may need to have a Plan B, such as sending the models to a mail order service bureau, such as Shapeways, to get all the student projects printed by the end of the term.
It’s also a good idea to set expectations upfront.
The cost of filament becomes a real issue for makerspace operators, as inevitably, some material is spoiled in failed printing attempts. (Sadly, the spoiled filament cannot be recycled easily to create new filament without a trip back to the factory.) Also, most common print materials, with PLA being the most common, need to be kept dry, so don’t unseal new packages until they are ready for use. Opened reels of filament can be stored in vacuum-sealed freezer bags (just don’t freeze them!) a dedicated food dehydrator can be used to dry the material out – but don’t get PLA too hot, or it will melt. (This can even happen to your PLA models if left in a hot car on a sunny summer day.)
Over time you will get a feel for a particular machine and which settings make it “happy,” as well as some clever tricks, such as spraying the bedplate with old school AquaNet hair spray before each print to create a sticky surface that the printed model will adhere to. (Wipe it off with a gentle cleaner after each use, and reapply again just before printing the next job.)
Small 3D printed objects are a good place to start because they print faster and use less material. If a student wants to print out a whole set of chess figurines or the entire cast of a Star Wars movie, they need to be gently guided toward a small version of their favorite character.
Read more...
Julia Solodovnikova
Formaspace
+1 800-251-1505
email us here
Visit us on social media:
Facebook
Twitter
LinkedIn
Unsure Of What 3D Printers Can Do? All Of The Useful Shop Tools Above Were Made Using 3D Printed Components.
Legal Disclaimer:
EIN Presswire provides this news content "as is" without warranty of any kind. We do not accept any responsibility or liability for the accuracy, content, images, videos, licenses, completeness, legality, or reliability of the information contained in this article. If you have any complaints or copyright issues related to this article, kindly contact the author above.


